
When we think of doing a super cool and long-lasting manicure, our minds inevitably go to manicure. gel nails. This technique is a favorite of many celebrities for creating incredible designs, lengthening nails and achieving lasting results. Therefore, there are many who dare to do it. your own gel nails at home and create great nail arts. So if you are one of those who want to try these types of nails, we will tell you everything you need to know to make them and get a professional result.
how to do step by step
First step: nail preparation
The first and basic step for a perfect and beautiful result, preparation of nails. We start by applying some alcohol to disinfect the hands and then the nails are prepared. We have to remove the skins, push cuticles with cuticle pusher this will help to remove them well, this step is very important because this way we avoid any lifting of the gel. And finally, polish the nail surface with a filefrom 100-180, for example, using the finer grained 180, which is perfect for removing roughness and excess oil; Also in this way we will create an excellent base for the gel product to adhere much better.
Step two: clean the nails so that there are no traces of oil or dirt
After preparing and shaping nails without skin and calluses, now it’s time to perfectly clean the surface of each nail to remove all dirt created during filing, such as dust or even grease that may have remained. This is done with a specific product known as cleanerand essential because, as we shall see, we will also use it in other steps to eliminate it. a sticky residue known as the scattering layer. and you need to remove it when your nails are dry.
Step three: put the mold or sticker on the nails
We remove the sticker and we mold it in the shape of a cone and we place it so that the base of the cone is under the natural nail so that we can stretch the nails over the decal. It is the person who acts as support for the ge product.I. This mold or sticker should be well adhered and adapted to each finger to avoid any gaps the product can go.
Step four: apply the primer or dryer
Next, apply primer or dry all over the nail without touching the cuticles. What this product does is prepare the nails for the following products and also “dry” the nail to remove any remaining oil. As we said before, it is very important that the gel adheres perfectly.
Step Five: Build the Nails
This is one of the most important steps we have to show our talent while doing gel nails. with the help of a special brush We’ll take a small pearl-sized amount of gel and start applying. apply at the point where the nail meets the moldbecause it is the tension point of the nail and the force that makes the length of the nail is here.
So you should build that part well and gradually go through the rest of the nail and its length (above the mold), but always avoid touching the cuticle. Also when we work with brush, we shouldn’t take too muchbecause then bubbles will form and the result will not be aesthetic at all.
Step Six: Cure the nails under a UV lamp
then you should put nails under UV or LED lamp two minutes. When removing the nails from the lamp they will feel sticky and the product will look like it has not dried well, but in reality it is a layer of dispersion, also known as residue, and should be removed with a cloth-applied cleaner. .
We will apply again a second layer of gel and we will do the same process under the lamp for two minutes to cure and clean the remaining layer. Once we have the nails of the desired thickness and after they are well cured, we can remove the stickers.
Seventh step: file gel nails
Now it’s time to shape gel nails with a file, this way we’ll soften the edges and edges and adjust the tab a bit more if it’s a bit wide. The surface of the nail is also filed without creating too much pressure, so nails are smooth and soft while looking flatter.
In this case, file 100-180 will be used for the finer portion 180; and then run a polishing padIt will leave a much more perfect, ultra-thin and smooth surface. Finally, we remove the dust on the file with a brush or nail brush and wipe it again with a damp cloth with the cleaner.
Eighth step: decoration and finishing
This time decide if we want the nails one color or embellishmentor, on the contrary, leave them in a natural shade. If we want to leave them natural, we only need to apply one layer. special top floor We will protect the nail and leave plenty of shine, and dry it under a UV lamp for two minutes to remove the dispersion layer.
On the other hand, if we want some colorful nails, we will use a special polish for gel nailsWe will let it cure for two minutes under the UV lamp and We will clean the sticky tissue with cleaner. And finally on colored enamel sealing gel, we return to curing in the lamp and remove the sticky residue again. And now yes, yes, we will have our nails completely done.
How long do gel nails last?
Gel nails should stay perfect for weeks as well as being nails that look beautiful, are well-maintained and have quality products. They can usually last three to five weeks. In addition, the material from which gel nails are made is much more flexible than when we compare it with acrylic nails, i.e. withstands blows much better.
The best products for a professional result

–nail setThree tools for cutting and removing cuticles, made of strong and durable stainless steel. cuticle cutter, Price 9.99 euros.

3 Piece Cuticle Lifter Cuticle Remover Steel
For €9.99 on Amazon today

–URAQT Professional Nail Files16 files in size 100-180, perfect for working on gel nails. The price is 6.59 Euros.

URAQT Professional Nail Files
For 6.59 Euros on Amazon today

–Keiby Citom Brighteners, two polishers with different faces to process the nails and make them completely fine and smooth. The price is 6.99 Euros.

Professional Nail File – Nail Polishing Block for Gel
For € 6.99 on Amazon today

–Coconut Flavor Cleanser + 10 High-Quality CelluloseIt is an excellent product for removing the sticky layer of UV/LED gels. The price is 7.99 euros.

Gel Cleanser 100ml Transparent Coconut Flavor + 10 High Quality Cellulose
For € 7.99 on Amazon today

–Saviland Nail Primer and DryerThis product perfectly prepares the nails without oil so that the gel product adheres perfectly. It does not contain acid in its formulation. Its price is 9.99 euros.

Saviland Nail Primer and Dryer
For €9.99 on Amazon today

–Tags-Gel Nail Molds, 200 stickers with marked numbers for styling gel nails. The price is 4.95 Euros.

200 Sheets Gold Manicure Paper Tray
For €4.95 on Amazon today

–Mylee Double Ended Gel Tool, dual-ended brush with spatula for perfect nails. The price is 5 Euros.

Mylee Double Ended Tool for Polymer Gel
Today on Amazon for €5.00

–Andreia Professional Hard Builder GelIt can be used alone as a high strength nail builder gel and strong coatings for nail extension, nail shaping or strengthening natural nails. It takes 60-90 seconds to cure under UV/LED lamp. The price is 28.90 Euros.

ndreia Professional Hard Builder Gel
For €28.90 on Amazon today

–Nail Store Monophase UV Gel, this gel is medium viscosity, very durable and elastic and does not drip. The price is 24.95 Euros.
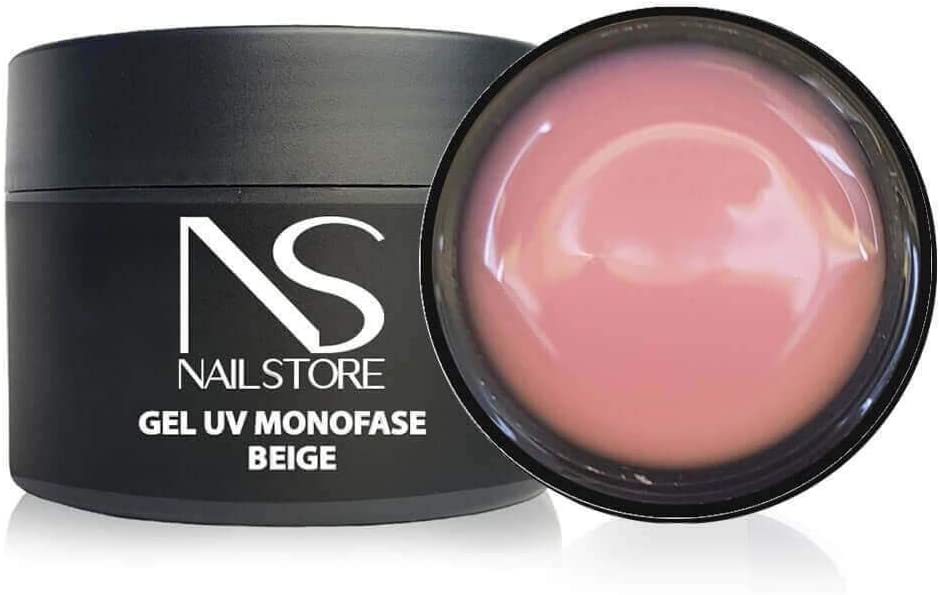
Nail Store – Gel UV Led Builder Gel Monophasic Cover Beige
Today on Amazon for 24.96 Euros

–NailStar Professional UV Lamp. This machine works with UV light, 36W power and comes with four lamps of 9 W each. Its timer is 2 and 3 minutes. It can be used to dry all kinds of nail gels such as UV specific, semi-permanent, Shellac CND, OPI or Bluesky. The price is 29.99 euros.

NailStar Professional UV Lamp Dry Nail Polish (36 W)
For €29.99 on Amazon today

–Elite99 Gel Nail Polishenamels offering long durability and beautiful colours. The price is 12.99 Euros.

Elite99 Semi Permanent Gel Nail Polish
For €12.99 on Amazon today
Note: Some of the links in this article are affiliates and may benefit Trenddencias.
Photos | @leminimacaron, @kimkimnails, @apresnailofficial, @nailsbymei
Source: Trendencias
I am Anne Johnson and I work as an author at the Fashion Vibes. My main area of expertise is beauty related news, but I also have experience in covering other types of stories like entertainment, lifestyle, and health topics. With my years of experience in writing for various publications, I have built strong relationships with many industry insiders. My passion for journalism has enabled me to stay on top of the latest trends and changes in the world of beauty.


.png "Mia Goth, Zach Galifianakis and Dan Stevens will star in the revenge comedy HEY BEAR")